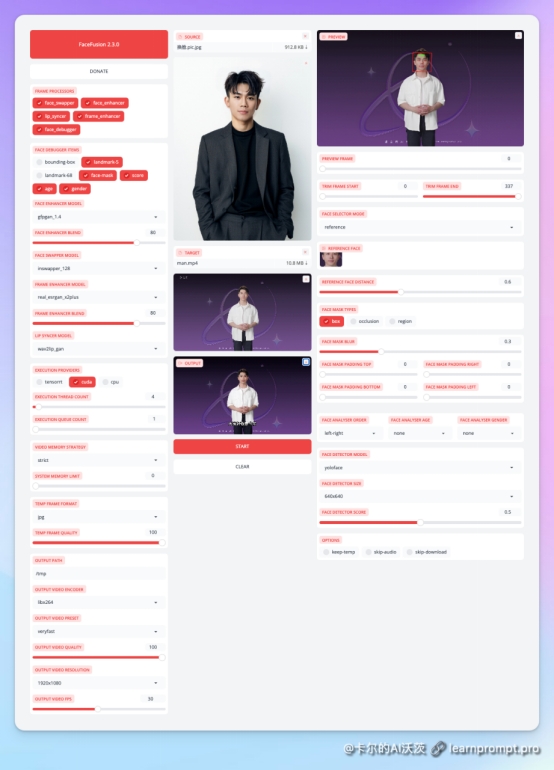
FaceFusion特点和界面
启动WEBUI后,大概是这个样子。
看起来有点复杂,没有最新的Rope那么简洁。
和Rope的对比,可以看上次写的��这篇。
但其实把一些参数设置好后,每次使用也是相当快捷的。
(一)参数控制的FaceFusion
前面提到过,FaceFusion和侧重GUI交互的Rope不一样,可以无界面进行命令行操作(CLI)。
所以它有非常非常多的参数可选。
当然,如果你启动的是WEBUI,那么大部分参数也可以通过界面调整。
而其中小部分参数必须在命令行中生效。
(1.1)启动参数
建议配合官方帮助来使用和了解参数含义。
那么目前版本有这些参数。
python run.py [options]
options:
-h, --help show this help message and exit
-s SOURCE_PATHS, --source SOURCE_PATHS choose single or multiple source images or audios
-t TARGET_PATH, --target TARGET_PATH choose single target image or video
-o OUTPUT_PATH, --output OUTPUT_PATH specify the output file or directory
-v, --version show program's version number and exit
misc:
--skip-download omit automate downloads and remote lookups
--headless run the program without a user interface
--log-level {error,warn,info,debug} adjust the message severity displayed in the terminal
execution:
--execution-providers EXECUTION_PROVIDERS [EXECUTION_PROVIDERS ...] accelerate the model inference using different providers (choices: cpu, ...)
--execution-thread-count [1-128] specify the amount of parallel threads while processing
--execution-queue-count [1-32] specify the amount of frames each thread is processing
memory:
--video-memory-strategy {strict,moderate,tolerant} balance fast frame processing and low vram usage
--system-memory-limit [0-128] limit the available ram that can be used while processing
face analyser:
--face-analyser-order {left-right,right-left,top-bottom,bottom-top,small-large,large-small,best-worst,worst-best} specify the order in which the face analyser detects faces.
--face-analyser-age {child,teen,adult,senior} filter the detected faces based on their age
--face-analyser-gender {female,male} filter the detected faces based on their gender
--face-detector-model {retinaface,yoloface,yunet} choose the model responsible for detecting the face
--face-detector-size FACE_DETECTOR_SIZE specify the size of the frame provided to the face detector
--face-detector-score [0.0-1.0] filter the detected faces base on the confidence score
face selector:
--face-selector-mode {reference,one,many} use reference based tracking with simple matching
--reference-face-position REFERENCE_FACE_POSITION specify the position used to create the reference face
--reference-face-distance [0.0-1.5] specify the desired similarity between the reference face and target face
--reference-frame-number REFERENCE_FRAME_NUMBER specify the frame used to create the reference face
face mask:
--face-mask-types FACE_MASK_TYPES [FACE_MASK_TYPES ...] mix and match different face mask types (choices: box, occlusion, region)
--face-mask-blur [0.0-1.0] specify the degree of blur applied the box mask
--face-mask-padding FACE_MASK_PADDING [FACE_MASK_PADDING ...] apply top, right, bottom and left padding to the box mask
--face-mask-regions FACE_MASK_REGIONS [FACE_MASK_REGIONS ...] choose the facial features used for the region mask (choices: skin, left-eyebrow, right-eyebrow, left-eye, right-eye, eye-glasses, nose, mouth, upper-lip, lower-lip)
frame extraction:
--trim-frame-start TRIM_FRAME_START specify the the start frame of the target video
--trim-frame-end TRIM_FRAME_END specify the the end frame of the target video
--temp-frame-format {bmp,jpg,png} specify the temporary resources format
--temp-frame-quality [0-100] specify the temporary resources quality
--keep-temp keep the temporary resources after processing
output creation:
--output-image-quality [0-100] specify the image quality which translates to the compression factor
--output-video-encoder {libx264,libx265,libvpx-vp9,h264_nvenc,hevc_nvenc} specify the encoder use for the video compression
--output-video-preset {ultrafast,superfast,veryfast,faster,fast,medium,slow,slower,veryslow} balance fast video processing and video file size
--output-video-quality [0-100] specify the video quality which translates to the compression factor
--output-video-resolution OUTPUT_VIDEO_RESOLUTION specify the video output resolution based on the target video
--output-video-fps OUTPUT_VIDEO_FPS specify the video output fps based on the target video
--skip-audio omit the audio from the target video
frame processors:
--frame-processors FRAME_PROCESSORS [FRAME_PROCESSORS ...] load a single or multiple frame processors. (choices: face_debugger, face_enhancer, face_swapper, frame_enhancer, lip_syncer, ...)
--face-debugger-items FACE_DEBUGGER_ITEMS [FACE_DEBUGGER_ITEMS ...] load a single or multiple frame processors (choices: bounding-box, landmark-5, landmark-68, face-mask, score, age, gender)
--face-enhancer-model {codeformer,gfpgan_1.2,gfpgan_1.3,gfpgan_1.4,gpen_bfr_256,gpen_bfr_512,restoreformer_plus_plus} choose the model responsible for enhancing the face
--face-enhancer-blend [0-100] blend the enhanced into the previous face
--face-swapper-model {blendswap_256,inswapper_128,inswapper_128_fp16,simswap_256,simswap_512_unofficial,uniface_256} choose the model responsible for swapping the face
--frame-enhancer-model {real_esrgan_x2plus,real_esrgan_x4plus,real_esrnet_x4plus} choose the model responsible for enhancing the frame
--frame-enhancer-blend [0-100] blend the enhanced into the previous frame
--lip-syncer-model {wav2lip_gan} choose the model responsible for syncing the lips
uis:
--ui-layouts UI_LAYOUTS [UI_LAYOUTS ...] launch a single or multiple UI layouts (choices: benchmark, default, webcam, ...)
1
2
3
4
5
6
7
8
9
10
11
12
13
14
15
16
17
18
19
20
21
22
23
24
25
26
27
28
29
30
31
32
33
34
35
36
37
38
39
40
41
42
43
44
45
46
47
48
49
50
51
52
53
54
55
56
57
58
59
60
61
62
63
64
65
66
67
68
69
70
71
比如下面这个例子。
指定了输出目录,部分模型,视频编码等:
python run.py -o D:\Temp\out\A --skip-download --execution-providers cuda --frame-processors face_swapper face_enhancer --face-enhancer-model gpen_bfr_256 --face-enhancer-blend 90 --output-video-encoder hevc_nvenc --output-video-quality 99 --face-mask-types box occlusion
1
(1.2)配置文件覆盖
不想每次都打很长的命令行,可以写入一个bat文件中。
然后作者考虑到了这点,有个更简单的办法。
把这些参数写入facefusion.ini配置文件,可以起到命令行参数同样的作用,同时更整洁易读。
但项目中作者提供的是facefusion.ini本身,而不是facefusion.ini.sample,会影响拉代码啊。
[general]
source_paths =
target_path =
output_path =
[misc]
skip_download =
headless =
log_level =
[execution]
execution_providers =
execution_thread_count =
execution_queue_count =
[memory]
video_memory_strategy =
system_memory_limit =
[face_analyser]
face_analyser_order =
face_analyser_age =
face_analyser_gender =
face_detector_model =
face_detector_size =
face_detector_score =
[face_selector]
face_selector_mode =
reference_face_position =
reference_face_distance =
reference_frame_number =
[face_mask]
face_mask_types =
face_mask_blur =
face_mask_padding =
face_mask_regions =
[frame_extraction]
trim_frame_start =
trim_frame_end =
temp_frame_format =
temp_frame_quality =
keep_temp =
[output_creation]
output_image_quality =
output_video_encoder =
output_video_preset =
output_video_quality =
output_video_resolution =
output_video_fps =
skip_audio =
[frame_processors]
frame_processors =
face_debugger_items =
face_enhancer_model =
face_enhancer_blend =
face_swapper_model =
frame_enhancer_model =
frame_enhancer_blend =
lip_syncer_model =
[uis]
ui_layouts =
1
2
3
4
5
6
7
8
9
10
11
12
13
14
15
16
17
18
19
20
21
22
23
24
25
26
27
28
29
30
31
32
33
34
35
36
37
38
39
40
41
42
43
44
45
46
47
48
49
50
51
52
53
54
55
56
57
58
59
60
61
62
63
64
65
66
67
(二)参数详解
(2.1)UI参数
(2.1.1)UI布局
��保持默认就好,咱通常用不到。
用来切换不同的UI布局。
用法: --ui-layouts
默认值: [ default ],可选这些值:
benchmark (基准测试)
default(默认值,换视频)
webcam (摄像头,直播)
比如: --ui-layouts benchmark 就启动测试性能的UI布局。
(2.2)杂项参数
(2.2.1)Skip Download
⚠️天朝网络必须得开(除非你的网络自动下载模型没问题)。
顾名思义用来跳过远程下载(必要的模型我们可以通过别的方式,提前下载好)
用法: --skip-download
(2.2.2)Headless
��保持默认就好,除非……
不使用界面的方式启动程序,适合在服务器上操作。
设置好各种参数后,一条命令运行直接出结果。
用法: --headless
(2.2.3)Log Level
��保持默认就好,咱通常用不到。
调整控制台输出的日志级别。
用法: --log-level
默认值: info,可选这些值:
error (错误)
warn (警告)
info (普通信息)
debug (调试)
比如: --log-level debug 打印调试日志。
(2.3)路径参数
��至少设个输出路径吧。
(2.3.1)Source
指定一个或多个源图像/音频(音频用于嘴型同步)
用法: -s 或者 --source
比如: --source image1.jpg --source image2.jpg --source audio.mp3
不通过参数指定时,在WEBUI中拖放或选择文件上传。
这里会显示多张图片的名称,以及其中一张的预览。
(2.3.2)Target
指定一张图像或视频作为目标。
用法: -t 或者 --target
比如: --target video.mp4
不通过参数指定时,在WEBUI中拖放或选择文件上传。
(2.3.3)Output
指定输出的文件或目录。
用法: -o 或者 --output
比如: --output .
就算指定了目录,处理完成后,输出的内容也会显示在WEBUI中。
点击【Clear】按钮可以清除WEBUI上的输出内容。
对了,既然是WEB,也可以下载。。。
(2.4)执行器参数
��根据显卡选择,大家都是用N卡的CDUA吧?
这种重要参数很影响速度,也比较固定,所以最好固定到命令行参数中。
或者写入配置文件。
(2.4.1)Execution Providers
执行器提供者,就是用啥来跑,CPU还是显卡。
在我这里可选的是cpu, cuda, TensorRT。不清楚是否支持Intel和ATI。
用法: --execution-providers
默认值: [ cpu ] —— 是的,它也是一个集合参数,可以多选。比如同时选cpu和cuda。
比如: --execution-providers cuda
(2.4.2)Execution Thread Count
处理线程数,只要显存够,开大些会比较快。
用法: --execution-thread-count
默认值: 1
范围: 1-128
比如: --execution-thread-count 4
(2.4.3)Execution Queue Count
队列长度,定义一个线程处理的帧数量。
没看懂,所以就开的1
用法: --execution-queue-count
默认值: 1
范围: 1-32
比如: --execution-queue-count 2
(2.5)内存参数
��保持默认就好。
(2.5.1)Video Memory Strategy
显存使用策略,为了不爆显存,我们可以用默认值。
我记得好像默认的strict,会每次处理都会清理显存,不保留不用的模型等。
如果显存很大可以试试另外两个参数。
用法: --video-memory-strategy
默认值: strict,可选这些值:
strict (严格)
moderate (中等)
tolerant (宽容)
比如: --video-memory-strategy tolerant
(2.5.2)System Memory Limit
系统内存限制,这个看各自的计算机内存有多少。.
用法: --system-memory-limit
默认值: 0
范围: 0-128
比如: --system-memory-limit 32
(2.6)帧处理器参数
FaceFusion像个工作流,所以需要选择一个或多个帧处理器。
然后选择它们的相关模型和参数。
(2.6.1)Frame Processors
��通常选交换和增强。
选择一个或多个帧处理器(默认就是交换)。
目前有5个帧处理器:交换,增强,调试、帧超分,嘴型同步。
未选中的帧处理器,其配置不会出现在WEB界面上。
用法: --frame-processors
默认值: [ face_swapper ]
可选: face_debugger, face_enhancer, face_swapper, frame_enhancer
比如: --frame-processors face_swapper face_enhancer
(2.6.2)Face Debugger Items
用于调试(显示检测和遮罩的对象)。
反正我没用过啊。
用法: --face-debugger-items
默认值: [ landmark-5, face-mask ]
可选: bounding-box, landmark-5, landmark-68, face-mask, score, age, gender
比如: --face-debugger-items landmark-68 score
(2.6.3)Face Enhancer Model
��小显存我比较喜欢gpen_bfr_256,大显存机器选gpen_bfr_512。
选择增强模型。
用法: --face-enhancer-model
默认值: gfpgan_1.4
可选: codeformer, gfpgan_1.2, gfpgan_1.3, gfpgan_1.4, gpen_bfr_256, gpen_bfr_512, restoreformer_plus_plus
比如: --face-enhancer-model codeformer
(2.6.4)Face Enhancer Blend
设置增强的融合度。.
用法: --face-enhancer-blend
默认值: 80
范围: 0-100 at 1
比如: --face-enhancer-blend 60
(2.6.5)Face Swapper Model
��虽然很多选择,但只能用inswapper_128,至于fp16看不出任何区别,应该会快一点点或者占用小点。
用其它模型的对比请见这里,效果确实不能让人满意。
选择交换模型。
用法: --face-swapper-model
默认值: inswapper_128_fp16
可选: blendswap_256, inswapper_128, inswapper_128_fp16, simswap_256, simswap_512_unofficial, uniface_256
比如: --face-swapper-model simswap_256
PS:正确的顺序是先交换,再增强。
但我遇到过bug,看日志变成了先增强再交换,这样最后结果就是没有增强,分辨率很低。
(2.6.6)Frame Enhancer Model
��慢死了不开。
选择整个视频帧的超分辨率模型(和前面用词不同方便区别)。
用法: --frame-enhancer-model
默认值: real_esrgan_x2plus
可选: real_esrgan_x2plus, real_esrgan_x4plus, real_esrnet_x4plus
比如: --frame-enhancer-model real_esrnet_x4plus
(2.6.7)Frame Enhancer Blend
设置帧超分辨率的融合度。
用法: --frame-enhancer-blend
默认值: 80
范围: 0-100 at 1
比如: --frame-enhancer-blend 60
(2.6.8)Lip Syncer Model
选择锥型同步模型。这也没得选啊:)
用法: --lip-syncer-model
默认值: wave2lip_gan
可选: wave2lip_gan (就它一个啊)
比如: --lip-syncer-model wave2lip_gan
(2.7)输出参数
不想写详细了。
可以不用管,用默认的就OK。
分辨率帧率这些也会随着dst自动改变。
PS:我设置视频编码为hevc_nven,实际出来并不是h265,依然是h264……奇怪。
(2.8)帧提取参数
不想写详细了。
就是你想预览哪一帧(首帧没有人可以改下)。
并且想处理从哪到哪帧。
如果处理整个视频,保持默认就好。
(2.9)面部分析参数
咋一看很多设置。
其实大部分都不用改,指定人了,就不管左右顺序,年龄,性别……
(2.9.1)Face Selector Mode
其实都不用改,默认就设为reference(参考),
然后从预览帧中提取的人里面选一个就可以了。
除了【参考】方式,其它选项还有【1个】,【多个】。我不知道该怎么用也没用过。
(2.9.2)Face Mask Types
默认box,如果有遮挡情况,就追加勾选occlusion。
(2.9.3)Face Detector
默认yoloface,也可以选retinaface。
具体有什么区别呢,借用Rope作者的话,没啥大区别,只有极端角度下会有不同。
最后那个yunet稍微弱一点,不建议选。
������������
神奇的时刻到了!!!
虽然FaceFusion没有Rope的分段角度设置,检测算法也一样。
但是除了大头朝下这种奇葩角度,其它角度它的检测都是正确的!!!
������������
PS:意思是绝大部分情况下,我们不用操心角度了,管他站着躺着呢。
(三)总结
即使上面有那么多参数(我偷懒了没有全部列出来),但和Rope相比还是缺少一些控制。
同时又具有Rope不具备的特性。
两个项目的目标明显不一样,各具特色。
建议亲自使用和对比FaceFusion 和 Rope。
熟悉以后再调整各种参数。
————————————————
版权声明:本文为博主原创文章,遵循 CC 4.0 BY-SA 版权协议,转载请附上原文出处链接和本声明。
原文链接:https://blog.csdn.net/ddrfan/article/details/136226323