使用python调用comfyui-api,实现出图自由
1.
title:
使用python调用comfyui-api,实现出图自由
2.
date: 2024-03-13 22:31:33
1、comfyui设置
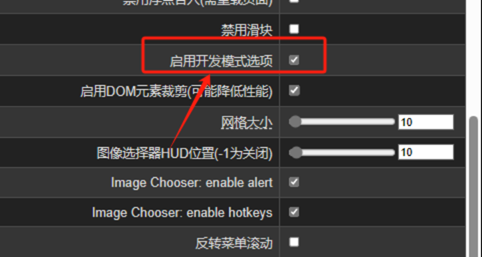
打开comfyui,记录下对应的端口,设置开发者模式


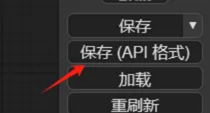
打开一条workflow工作流,这里以comfyui自带的工作流为例,保存为api格式

再次打开api格式工作流
这里一定再次点击查看是否能运行正常,因为有的节点可能在api格式中无法运作
确定可以在comfyui中正常启动就可以下一步了
2、python设置
新建一个python脚本,将以下内容粘贴进去
1.
import json
2.
import
websocket #
NOTE: websocket-client (https://github.com/websocket-client/websocket-client)
3.
import uuid
4.
import
urllib.request
5.
import
urllib.parse
6.
import
random
7.
# 定义一个函数来显示GIF图片
8.
def
show_gif(fname):
9.
import
base64
10.
from IPython import
display
11.
12.
with
open(fname, 'rb') as fd:
13.
b64 =
base64.b64encode(fd.read()).decode('ascii')
14.
return
display.HTML(f'<img
src="data:image/gif;base64,{b64}" />')
15.
# 定义一个函数向服务器队列发送提示信息
16.
def
queue_prompt(prompt):
17.
p = {"prompt":
prompt, "client_id":
client_id}
18.
data = json.dumps(p).encode('utf-8')
19.
req = urllib.request.Request("http://{}/prompt".format(server_address),
data=data)
20.
return
json.loads(urllib.request.urlopen(req).read())
21.
# 定义一个函数来获取图片
22.
def
get_image(filename, subfolder, folder_type):
23.
data = {"filename":
filename, "subfolder":
subfolder, "type":
folder_type}
24.
url_values = urllib.parse.urlencode(data)
25.
with
urllib.request.urlopen("http://{}/view?{}".format(server_address,
url_values)) as
response:
26.
return
response.read()
27.
# 定义一个函数来获取历史记录
28.
def
get_history(prompt_id):
29.
with
urllib.request.urlopen("http://{}/history/{}".format(server_address,
prompt_id)) as
response:
30.
return
json.loads(response.read())
31.
# 定义一个函数来获取图片,这涉及到监听WebSocket消息
32.
def
get_images(ws, prompt):
33.
prompt_id = queue_prompt(prompt)['prompt_id']
34.
print('prompt')
35.
print(prompt)
36.
print('prompt_id:{}'.format(prompt_id))
37.
output_images = {}
38.
while True:
39.
out =
ws.recv()
40.
if
isinstance(out,
str):
41.
message = json.loads(out)
42.
if
message['type'] == 'executing':
43.
data = message['data']
44.
if data['node'] is None and data['prompt_id'] ==
prompt_id:
45.
print('执行完成')
46.
break # 执行完成
47.
else:
48.
continue # 预览为二进制数据
49.
history = get_history(prompt_id)[prompt_id]
50.
print(history)
51.
for o in
history['outputs']:
52.
for
node_id in history['outputs']:
53.
node_output = history['outputs'][node_id]
54.
# 图片分支
55.
if 'images' in
node_output:
56.
images_output = []
57.
for image
in node_output['images']:
58.
image_data =
get_image(image['filename'],
image['subfolder'],
image['type'])
59.
images_output.append(image_data)
60.
output_images[node_id] =
images_output
61.
# 视频分支
62.
if 'videos' in
node_output:
63.
videos_output = []
64.
for video
in node_output['videos']:
65.
video_data =
get_image(video['filename'],
video['subfolder'],
video['type'])
66.
videos_output.append(video_data)
67.
output_images[node_id] =
videos_output
68.
print('获取图片完成')
69.
print(output_images)
70.
return
output_images
71.
# 解析工作流并获取图片
72.
def
parse_worflow(ws, prompt, seed, workflowfile):
73.
workflowfile = workflowfile
74.
print('workflowfile:'+workflowfile)
75.
with
open(workflowfile, 'r',
encoding="utf-8") as
workflow_api_txt2gif_file:
76.
prompt_data =
json.load(workflow_api_txt2gif_file)
77.
# 设置文本提示
78.
prompt_data["6"]["inputs"]["text"] =
prompt
79.
return
get_images(ws, prompt_data)
80.
# 生成图像并显示
81.
def
generate_clip(prompt, seed, workflowfile, idx):
82.
print('seed:'+str(seed))
83.
ws = websocket.WebSocket()
84.
ws.connect("ws://{}/ws?clientId={}".format(server_address,
client_id))
85.
images = parse_worflow(ws, prompt, seed,
workflowfile)
86.
for
node_id in images:
87.
for
image_data in
images[node_id]:
88.
from
datetime import
datetime
89.
# 获取当前时间,并格式化为 YYYYMMDDHHMMSS 的格式
90.
timestamp =
datetime.now().strftime("%Y%m%d%H%M%S")
91.
# 使用格式化的时间戳在文件名中
92.
GIF_LOCATION = "{}/{}_{}_{}.png".format(SageMaker_ComfyUI, idx,
seed, timestamp)
93.
print('GIF_LOCATION:'+GIF_LOCATION)
94.
with
open(GIF_LOCATION, "wb") as
binary_file:
95.
# 写入二进制文件
96.
binary_file.write(image_data)
97.
show_gif(GIF_LOCATION)
98.
print("{}
DONE!!!".format(GIF_LOCATION))
99.
import
pandas as pd
100.
#
Example of reading from a CSV file
101.
def
read_prompts_from_csv(csv_file_path):
102.
df = pd.read_excel(csv_file_path)
103.
return df['prompt'].tolist()
104.
#
Execute the main function
105.
if
__name__ == "__main__":
106.
# 设置工作目录和项目相关的路径
107.
WORKING_DIR = 'output'
108.
SageMaker_ComfyUI =
WORKING_DIR
109.
workflowfile = 'workflow_api.json'
110.
COMFYUI_ENDPOINT = '127.0.0.1:8188'
111.
server_address = COMFYUI_ENDPOINT
112.
client_id = str(uuid.uuid4()) # 生成一个唯一的客户端ID
113.
seed = 15465856
114.
csv_file_path = 'prompt.xlsx'
115.
prompts =
read_prompts_from_csv(csv_file_path)
116.
idx = 1
117.
for
prompt in prompts:
118.
generate_clip(prompt, seed,
workflowfile, idx)
119.
idx += 1
120.
替换相应的参数,比如workflowfile文件名、COMFYUI_ENDPOINT地址,
WORKING_DIR输出文件的目录是对应脚本文件的
接着打开存储工作流api信息的josn文件
找到我们要修改的参数,比如我要修改正向提示词参数

可以看到其对应的键值位置是["6"]["inputs"]["text"]
就可以设置对应的参数,在函数中解析替换这个键值
我在最后还设置了一个文件'prompt.xlsx',方便写入大量的prompt进行替换
这样就可以解放双手,996的压榨显卡啦(不是)
3、参考来源
[【全网首发】ComfyUI-API详解,应用开发调用全流程!哔哩哔哩bilibili](https://www.bilibili.com/video/BV1Pm4y1K7Ey/?spmidfrom=333.337.search-card.all.click&vd_source=90ce3ea8a5a8a661b09e5d13bfb5f43a)
出自:https://mp.weixin.qq.com/s/CT8IBOJZVeMhV0ktlOiSRg